Posts

Showing posts with the label photography

Reverse Lens Macro

Image
An interesting technique I learned from a high school friend is the "reverse lens macro." Basically, it takes advantage of the fact that a lens works (i.e., focuses light) in both directions. This technique allows you to focus on a subject that is very close to the camera (within a few inches), closer than with a regularly-mounted lens. This can be used as an effective cheap macro solution. There are two main problems with this, which I will address: 1) Less light makes it to the camera sensor, and the camera has trouble reading exposure. 2) The depth of field becomes incredibly short, so it's hard to get enough of the picture in focus, and hard to get exactly what you want into focus. If you have a digital SLR camera, you can try this technique. It works best with a lens with a focal length of around 50mm. Put the camera in manual mode. This is necessary because of the difficulty in metering the light. Detach lens. As I mentioned before, it's tough to get cor...

Photographing Smoke

Image
One thing I've been doing a lot lately is photographing smoke. I think it makes some really interesting abstract shapes, especially when you get a really simple shape in the smoke. And it's not all that hard to do; it just takes a little patience. Ideally, you should have a camera with flash, manual focus, and shutter speed control. If you don't have some of those features, you can probably still take these kind of pictures, but it might be a little harder to do. Additionally, you'll need a stick of incense (or something similar that will continuously produce smoke without a flame), and it needs to be dark outside, preferably with little wind. First, set your camera to use the flash, then set the manual focus to roughly two feet. Next, light the incense and let some smoke build up. Hold the incense at the same distance as your focus (in this case, about 2 feet away). Try taking a picture of the smoke against the night sky (so you have a solid black background). I...

Alternate Angles

Image
Sometimes it's cool to mix up your photography by experimenting with different angles. Rather than taking your pictures straight on, try moving yourself to a different position until you find a different perspective on the scene. Instead of taking a frontal picture of a group of people, maybe find a balcony above that you can take the picture from. Sometimes you'll end up with some pretty good looking pictures. In the above picture of some stairs in the Vatican Museum, I wanted to capture both the height of the stairs and the geometric pattern. By taking this picture from straight above, you can see the spiral design of the stairs while getting a feel for its height. This next picture (of a church tower in Rome) was taken from a lower angle. Sometimes you need to get low to the ground to get a more extreme angle to give a better perspective (or to make an exaggeration). Often times, that's necessary just to get the whole subject in the shot (the Washington Monument co...

High Speed Photography

Image
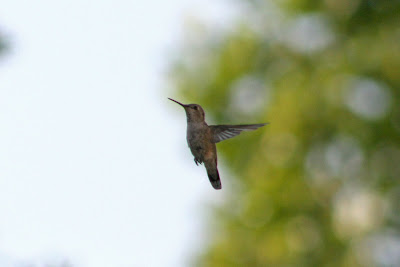
This is just a quick post to show you the opposite of my previous post. In the last post ( Working with Slow Shutter Speeds ), you learned how to leave the shutter open longer to expose the camera to more light and create photographs that show the passing of time. High speed photography can be used to capture very fast motion, while still giving a clear picture (see the example at the end of the post). This time, instead of increasing the amount of time you leave the shutter open, decrease it (something like 1/1000th of a second). Again, the camera will adjust the other settings for you, if possible. You can use this to take pictures like this: I used a 1/2500th of a second exposure time for this one, and I barely got it in time (it's near impossible to photograph a humming bird; they zip around too much).

Working with Slow Shutter Speeds

Image
Many digital cameras (from digital SLRs to simple point-and-shoot cameras) now include an option to adjust the shutter speed , or how long the shutter of the camera is open. This allows you to capture not just a moment in time, but maybe a few seconds, or more, in your pictures. The above picture is of the Champs-Élysées, a very busy street, in Paris, taken from the Arc de Triomphe. For this shot, I left the shutter of the camera open for 30 seconds. During that time, cars drove down the street, and because the camera captures any light while the shutter is open, it results in streaks of white and red lines from the cars' lights. To use this feature, you'll want to look for any kind of shutter-control mode on your camera. Canon (and probably a few others) call it "Tv" mode, for "time value." Once you've found it, try increasing the amount of time that the shutter is open (a typical amount of time for a regular picture is usually between 1/200th and ...

The Rule of Thirds

Image
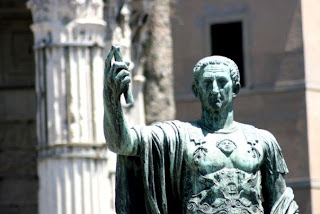
Almost everyone who has picked up a camera has heard of the rule of thirds , but not everyone uses it when composing their photographs. And while some photographers write it off as a trite technique, there's no denying that it can improve your pictures. The idea is to envision a 3x3 grid when looking through the viewfinder of your camera. Imagine where the grid's lines would cross, and place your subjects at those intersections (like in the grid that follows). In addition, it is a good idea to place any lines (horizons, edges of buildings, etc) along the lines of the imaginary grid. In doing so, you draw attention to certain points in the picture, while at the same time introducing an interesting, non-symmetrical composition. I used the rule of thirds to compose this photograph of a statue in Rome, with some ruins in the background. I've put a grid on the picture to show how I used the rule of thirds to create a more interesting picture. Notice how the top right inters...