Reverse Lens Macro
An interesting technique I learned from a high school friend is the "reverse lens macro." Basically, it takes advantage of the fact that a lens works (i.e., focuses light) in both directions.

This technique allows you to focus on a subject that is very close to the camera (within a few inches), closer than with a regularly-mounted lens. This can be used as an effective cheap macro solution. There are two main problems with this, which I will address: 1) Less light makes it to the camera sensor, and the camera has trouble reading exposure. 2) The depth of field becomes incredibly short, so it's hard to get enough of the picture in focus, and hard to get exactly what you want into focus.
If you have a digital SLR camera, you can try this technique. It works best with a lens with a focal length of around 50mm.
This technique is very useful for showing details that you would normally miss with the naked eye or a standard lens.

Notice the texture of the paper.

Nature photos are especially interesting.
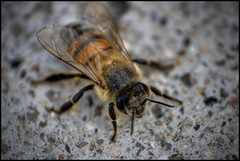
This is a pseudo-hdr reverse lens macro.
Here are some extra tips:
I encourage everyone to try this out if possible. Note: this can let extra dust reach your sensor, so be careful to leave the sensor open to air as little as possible. I haven't had problems, but I know that dust can easily reach your lens this way.
Additionally, I know there are converters that allow you to mount a lens onto your camera backwards, so you don't have to manually hold it.
As always, post any cool pictures you take, and contact me for more information.
This technique allows you to focus on a subject that is very close to the camera (within a few inches), closer than with a regularly-mounted lens. This can be used as an effective cheap macro solution. There are two main problems with this, which I will address: 1) Less light makes it to the camera sensor, and the camera has trouble reading exposure. 2) The depth of field becomes incredibly short, so it's hard to get enough of the picture in focus, and hard to get exactly what you want into focus.
If you have a digital SLR camera, you can try this technique. It works best with a lens with a focal length of around 50mm.
- Put the camera in manual mode. This is necessary because of the difficulty in metering the light.
- Detach lens. As I mentioned before, it's tough to get correct focus due to short depth of field. This can be fixed by making the aperture smaller (optional):
- Adjust the aperture (through manual mode) to around f/1
- Preview the aperture by pressing and holding the aperture preview button. On a Canon XTi, for example, the button is located just below the button that removes the lens.
- Remove the lens while continuing to hold down the aperture preview button.
- Hold the lens up to the front of the camera, sealing the camera's opening from any other light the best you can.
- Without paying much attention to the displayed exposure, take a picture of your subject (you will need to get within a few inches).
- View the picture you took on the camera, and adjust the exposure accordingly.
This technique is very useful for showing details that you would normally miss with the naked eye or a standard lens.
Notice the texture of the paper.
Nature photos are especially interesting.
This is a pseudo-hdr reverse lens macro.
Here are some extra tips:
- The level of magnification of a reversed lens is inversely related to the listed focal length. If you would normally be moving the glass closer to the focal plane, you are now moving it further. Hence, if you want to magnify something in the reverse lens, change to a lower focal length. For this reason, telephoto lenses don't end up magnifying the image much, if at all.
- A lower regular focal length requires you to position the lens much closer to the subject. I found the following distances:
- 55mm = 4 inches
- 18mm = 1.5 inches
- Shoot in direct sunlight to get adequate exposure. Even in direct sunlight, you may need a higher ISO than you would normally use outdoors.
- You'll need to hold the camera very still since your subject is very close to the camera.
I encourage everyone to try this out if possible. Note: this can let extra dust reach your sensor, so be careful to leave the sensor open to air as little as possible. I haven't had problems, but I know that dust can easily reach your lens this way.
Additionally, I know there are converters that allow you to mount a lens onto your camera backwards, so you don't have to manually hold it.
As always, post any cool pictures you take, and contact me for more information.


Comments